반응형
Ultralytics YOLOv8은Ultralytics 에서 개발한 YOLO(You Only Look Once) 객체 감지 및 이미지 분할 모델의 최신 버전입니다. YOLOv8은 이전 YOLO 버전의 성공을 바탕으로 새로운 기능과 개선 사항을 도입하여 성능과 유연성을 더욱 향상시키는 최첨단 SOTA(최신 기술) 모델입니다.
YOLOv8 Docs
Home Welcome to the Ultralytics YOLOv8 documentation landing page! Ultralytics YOLOv8 is the latest version of the YOLO (You Only Look Once) object detection and image segmentation model developed by Ultralytics. This page serves as the starting point for
docs.ultralytics.com
설치방법
pip install ultralytics
Train
from ultralytics import YOLO

model = YOLO("yolov8n.pt") # pass any model type
model.train(epochs=5)
Validation
  from ultralytics import YOLO

  model = YOLO("model.pt")
  # It'll use the data yaml file in model.pt if you don't set data.
  model.val()
  # or you can set the data you want to val
  model.val(data="coco128.yaml")
Predict
from ultralytics import YOLO
from PIL import Image
import cv2

model = YOLO("model.pt")
# accepts all formats - image/dir/Path/URL/video/PIL/ndarray. 0 for webcam
results = model.predict(source="0")
results = model.predict(source="folder", show=True) # Display preds. Accepts all YOLO predict arguments

# from PIL
im1 = Image.open("bus.jpg")
results = model.predict(source=im1, save=True)  # save plotted images

# from ndarray
im2 = cv2.imread("bus.jpg")
results = model.predict(source=im2, save=True, save_txt=True)  # save predictions as labels

# from list of PIL/ndarray
results = model.predict(source=[im1, im2])
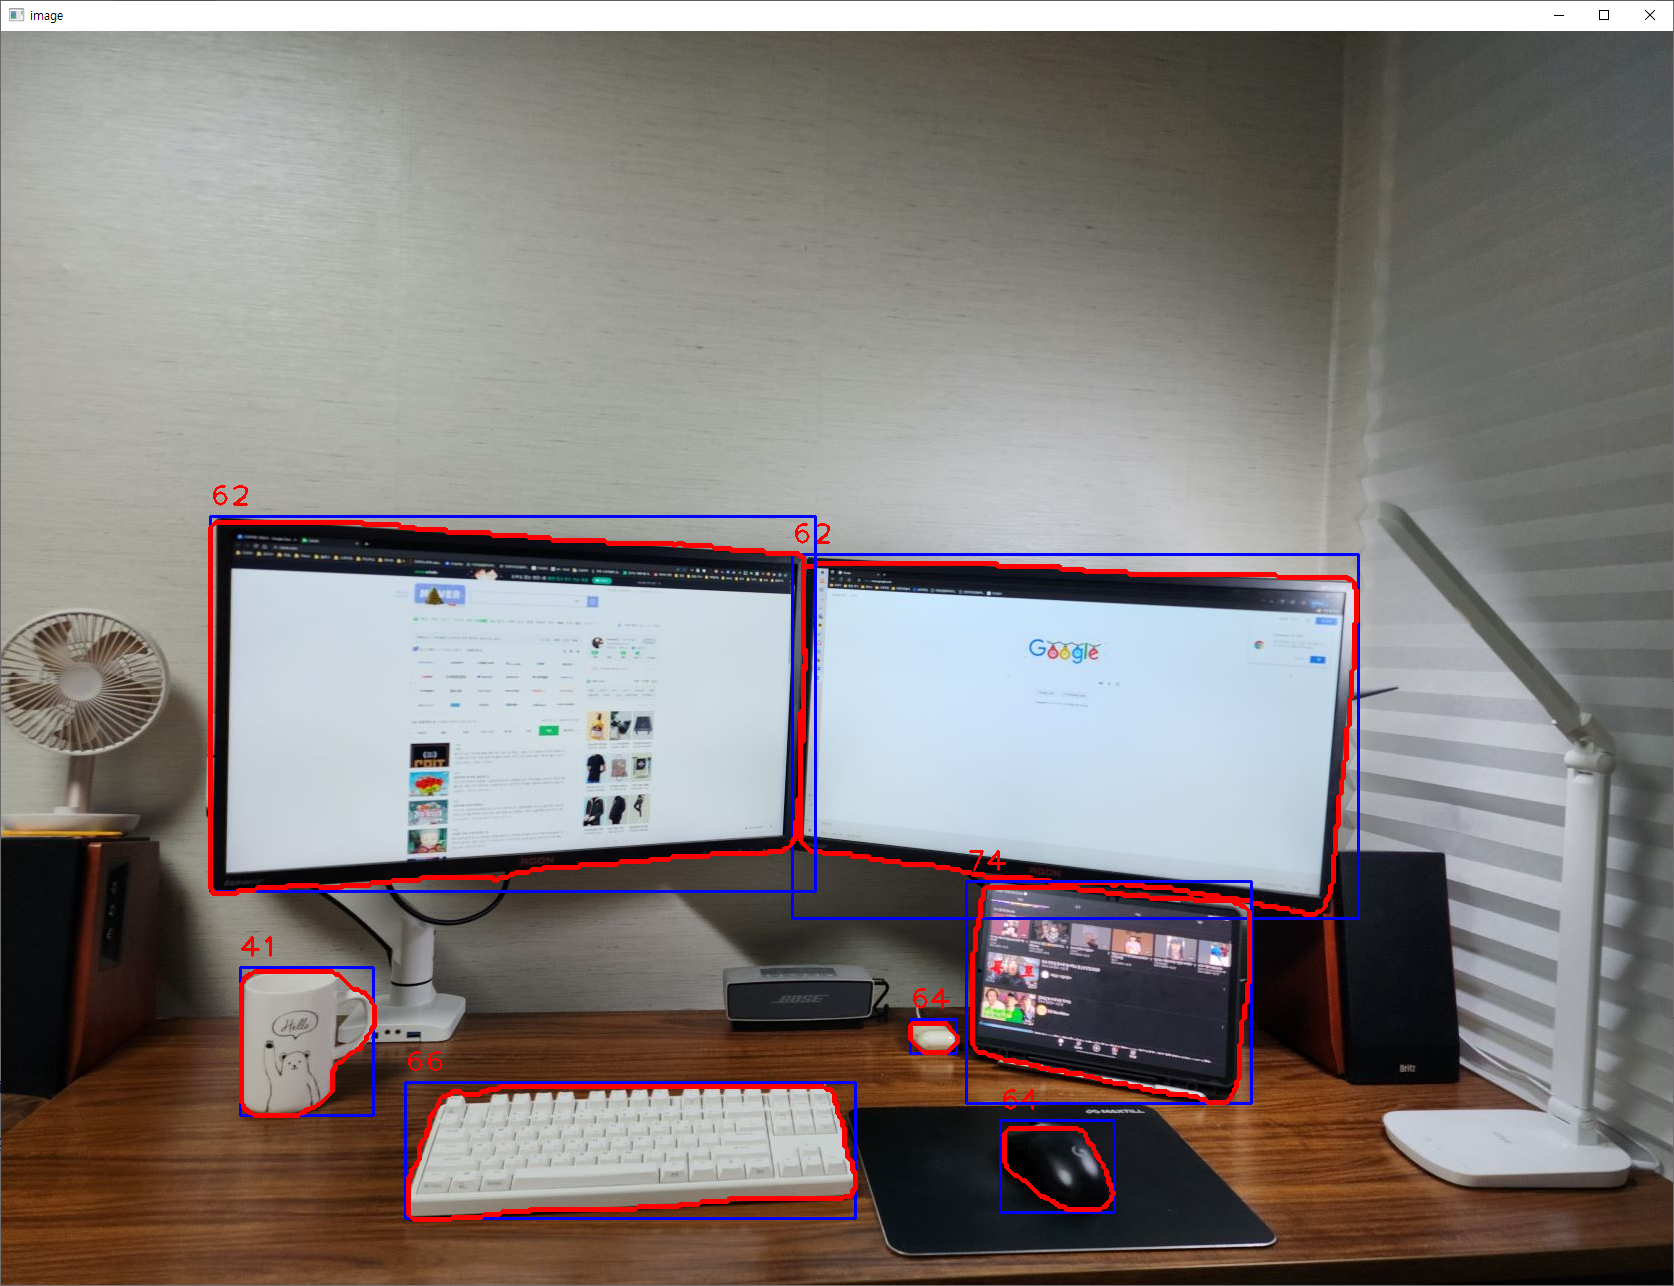
간단한 테스트
from ultralytics import YOLO
import numpy as np

class YOLOSegmentation:
    def __init__(self, model_path):
        self.model = YOLO(model_path)

    def detect(self, img):
        # Get img shape
        height, width, channels = img.shape

        results = self.model.predict(source=img.copy(), save=False, save_txt=False)
        result = results[0]
        segmentation_contours_idx = []
        for seg in result.masks.segments:
            # contours
            seg[:, 0] *= width
            seg[:, 1] *= height
            segment = np.array(seg, dtype=np.int32)
            segmentation_contours_idx.append(segment)

        bboxes = np.array(result.boxes.xyxy.cpu(), dtype="int")
        # Get class ids
        class_ids = np.array(result.boxes.cls.cpu(), dtype="int")
        # Get scores
        scores = np.array(result.boxes.conf.cpu(), dtype="float").round(2)
        return bboxes, class_ids, segmentation_contours_idx, scores
#pip install ultralytics

import os
os.chdir("E:\GoogleDrive\pycv\YOLOv8_segmentation")
os.getcwd()
import cv2
from YOLOv8_segmentation.yolov8_segmentation.yoloseg import YOLOSegmentation

img2 = cv2.imread("img.png")
img2 = cv2.resize(img2, None, fx=0.7, fy=0.7)

# Segmentation detector
ys = YOLOSegmentation("yolov8m-seg.pt")

bboxes, classes, segmentations, scores = ys.detect(img2)
for bbox, class_id, seg, score in zip(bboxes, classes, segmentations, scores):
    # print("bbox:", bbox, "class id:", class_id, "seg:", seg, "score:", score)
    (x, y, x2, y2) = bbox
    # if class_id == 32:
    cv2.rectangle(img2, (x, y), (x2, y2), (255, 0, 0), 2)

    cv2.polylines(img2, [seg], True, (0, 0, 255), 4)

    cv2.putText(img2, str(class_id), (x, y - 10), cv2.FONT_HERSHEY_PLAIN, 2, (0, 0, 255), 2)

cv2.imshow("image", img2)
cv2.waitKey(0)
'영상처리 > 기초' 카테고리의 다른 글
| convolution(합성곱) (83) | 2023.05.04 |
|---|---|
| Image Processing 기초 (141) | 2023.05.03 |
| 영상 요약해주는 Vision Transformer 모델 (30) | 2023.02.26 |
| Vision Transformer(ViT) 리뷰 (16) | 2023.02.26 |
| GAN(Generative Adversarial Networks) (92) | 2023.02.15 |