반응형

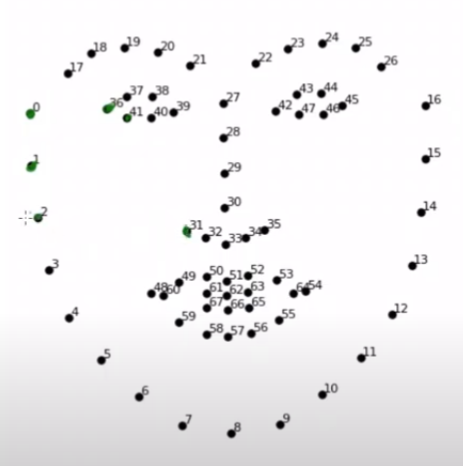
포인트의 인덱스 번호를 이용하여 다른 특징을 가진 두 얼굴의 같은 포인트 인덱스 번호 위치의 삼각형을 판별하고 해당 삼각형으로 원본 얼굴에서 타겟얼굴로 매칭을 해줍니다.


랜드마크 포인트 배열에서 삼각형의 인덱스를 추출하기 위해 나중에 필요한 함수를 만들었습니다.
import cv2
import numpy as np
import dlib

def extract_index_nparray(nparray):
    index = None
    for num in nparray[0]:
        index = num
        break
    return index
교환하려는 두 이미지를 로드하고 그레이스케일로 변환한 다음 얼굴 렌드마크 검출기도 로드합니다.
img = cv2.imread("bradley_cooper.jpg")
img2 = cv2.imread("jim_carrey.jpg")
img_gray = cv2.cvtColor(img, cv2.COLOR_BGR2GRAY)
img2_gray = cv2.cvtColor(img2, cv2.COLOR_BGR2GRAY)
mask = np.zeros_like(img_gray)

# Loading Face landmarks detector
detector = dlib.get_frontal_face_detector()
predictor = dlib.shape_predictor("shape_predictor_68_face_landmarks.dat")
첫 번째 얼굴의 랜드마크 포인트의 Delaunay Triangulation을 찾습니다.
# Face 1
faces = detector(img_gray)
for face in faces:
    landmarks = predictor(img_gray, face)
    landmarks_points = []
    for n in range(0, 68):
        x = landmarks.part(n).x
        y = landmarks.part(n).y
        landmarks_points.append((x, y))

        #cv2.circle(img, (x, y), 3, (0, 0, 255), -1)

    points = np.array(landmarks_points, np.int32)
    convexhull = cv2.convexHull(points)
    cv2.polylines(img, [convexhull], True, (255, 0, 0), 3)
    cv2.fillConvexPoly(mask, convexhull, 255)

    face_image_1 = cv2.bitwise_and(img, img, mask=mask)

    # Delaunay triangulation
    rect = cv2.boundingRect(convexhull)
    subdiv = cv2.Subdiv2D(rect)
    subdiv.insert(landmarks_points)
    triangles = subdiv.getTriangleList()
    triangles = np.array(triangles, dtype=np.int32)
삼각형의 좌표뿐만 아니라 각 삼각형이 연결하는 특정 랜드마크 지점을 알고 싶습니다.
    indexes_triangles = []
    for t in triangles:
        pt1 = (t[0], t[1])
        pt2 = (t[2], t[3])
        pt3 = (t[4], t[5])

        index_pt1 = np.where((points == pt1).all(axis=1))
        index_pt1 = extract_index_nparray(index_pt1)

        index_pt2 = np.where((points == pt2).all(axis=1))
        index_pt2 = extract_index_nparray(index_pt2)

        index_pt3 = np.where((points == pt3).all(axis=1))
        index_pt3 = extract_index_nparray(index_pt3)

        if index_pt1 is not None and index_pt2 is not None and index_pt3 is not None:
            triangle = [index_pt1, index_pt2, index_pt3]
            indexes_triangles.append(triangle)


        cv2.line(img, pt1, pt2, (0, 0, 255), 2)
        cv2.line(img, pt2, pt3, (0, 0, 255), 2)
        cv2.line(img, pt1, pt3, (0, 0, 255), 2)
삼각형의 인덱스를 알면 두 번째 면의 랜드마크 점에서 시작하여 동일한 삼각형을 찾을 수 있습니다. 이제 두 번째 면에서 랜드마크를 찾습니다.
# Face 2
faces2 = detector(img2_gray)
for face in faces2:
    landmarks = predictor(img2_gray, face)
    landmarks_points = []
    for n in range(0, 68):
        x = landmarks.part(n).x
        y = landmarks.part(n).y
        landmarks_points.append((x, y))

        cv2.circle(img2, (x, y), 3, (0, 255, 0), -1)
두 번째 면에 삼각형을 그릴 수 있습니다.
# Triangulation of the second face, from the first face delaunay triangulation
for triangle_index in indexes_triangles:
    pt1 = landmarks_points[triangle_index[0]]
    pt2 = landmarks_points[triangle_index[1]]
    pt3 = landmarks_points[triangle_index[2]]

    cv2.line(img2, pt1, pt2, (0, 0, 255), 2)
    cv2.line(img2, pt3, pt2, (0, 0, 255), 2)
    cv2.line(img2, pt1, pt3, (0, 0, 255), 2)
마침내 화면에 이미지를 보여줍니다
cv2.imshow("Image 1", img)
cv2.imshow("Face image 1", face_image_1)
cv2.imshow("image2", img2)
cv2.imshow("Mask", mask)
cv2.waitKey(0)
cv2.destroyAllWindows()
'영상처리 > 기초' 카테고리의 다른 글
| Face swapping-Swap faces(part 5) (6) | 2023.01.06 |
|---|---|
| Face swapping-Select and Warp triangles(part 4) (0) | 2023.01.06 |
| Face swapping-Delaunay Triangulation(part 2) 들로네 삼각분할 (19) | 2023.01.05 |
| Face swapping (part1) 얼굴 교환 (5) | 2023.01.05 |
| haar cascade face detection 얼굴 검출 (12) | 2023.01.05 |