석사 초반에 C++잠깐 건드려 보고 처음 해보는 C++입니다. 그때 당시에도 되게 불편했었는데 오늘 또 한번 느끼네요. 최근에 파이썬과 러스트만 다뤘는데 파이썬이 얼마나 편한 언어인지, 초보자도 쉽게 배울수 있는 언어라는걸 다시한번 깨닫게 되네요.
C++컴파일러 설치
build-essential 패키지를 설치하면 gcc, g++ 등 컴파일에 필요한 패키지들이 설치됩니다.
$ sudo apt-get install build-essential
Visual Studio Code 설치
curl을 설치해줍니다. 이미 설치되어 있다고 메시지가 보일 수도 있습니다.
$ sudo apt-get install curl
마이크로소프트 GPG 키를 다운로드하여 /etc/apt/trusted.gpg.d/ 경로에 복사해줍니다.
$ sudo sh -c 'curl https://packages.microsoft.com/keys/microsoft.asc | gpg --dearmor > /etc/apt/trusted.gpg.d/microsoft.gpg'
Visual Studio Code를 다운로드 받기 위한 저장소를 추가합니다.
$ sudo sh -c 'echo "deb [arch=amd64] https://packages.microsoft.com/repos/vscode stable main" > /etc/apt/sources.list.d/vscode.list'추가한 저장소로부터 패키지 목록을 가져옵니다.
$ sudo apt update
Visual Studio Code를 설치합니다.
$ sudo apt install code
프로젝트 생성 및 파일 생성
새프로젝트를 생성하고 새파일을 추가하여 OO.cpp파일명을 입력합니다.
cpp파일에 아래 내용을 입력합니다.
언어 처음 배우거나 실행할땐 항상 hello world죠 ㅎ
#include <iostream>

using namespace std;

int main()
{
    cout << "Hello, World!" << endl;

    return 0;
}
C++언어 확장 지원 설치
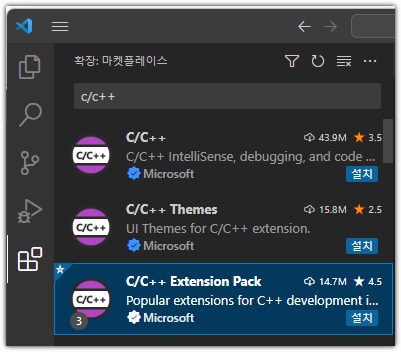
Ctrl + Shift + X를 누르고 C++을 입력합니다.
검색된 리스트에서 C/C++ Extension Pack항목에 있는 파란색 설치를 클릭합니다.

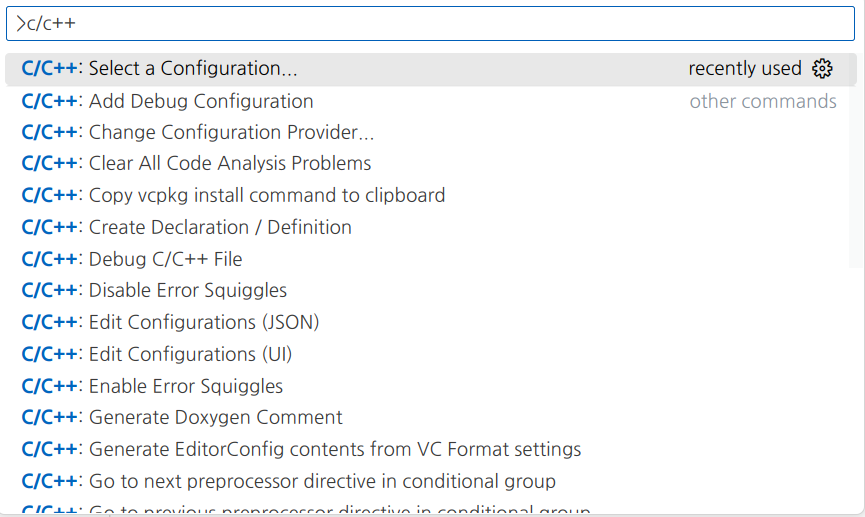
Ctrl+Shift+P를 눌러 C/C++을 입력한후 “C/C++: Select a Configuration...”을 선택합니다.

Edit Configuration(UI)를 선택합니다.

헤더파일 인식하여 작성한 코드에 유용한 정보를 제공하기 위해 필요한 작업입니다.
g++을 선택해주세요.

IntelliSense 모드로 사용하는 운영체제에 따라서 linux-gcc-x64를 선택하세요.

추가로 사용할 헤더파일의 경로를 추가합니다.

사용할 C 및 C++ 표준을 지정할 수 있습니다.

UI에서 설정을 마치고 탭을 닫으면 .vscode폴더에 c_cpp_properties.json파일이 추가되어 있습니다.
코드 컴파일 및 실행
메뉴에서 Termianl > Configure Tasks을 선택합니다.
create tasks.json file from template을 선택합니다.

Others를 선택합니다.

.vscode폴더에 tasks.json파일이 추가가 됩니다.
tasks.json 내용을 다음으로 교체하고 Ctrl + S를 눌러서 저장합니다
{
    "version": "2.0.0",
    "runner": "terminal",
    "type": "shell",
    "echoCommand": true,
    "presentation" : { "reveal": "always" },
    "tasks": [
          //C++ 컴파일
          {
            "label": "save and compile for C++",
            "command": "g++",
            "args": [
                "${file}",
                "-o",
                "${fileDirname}/${fileBasenameNoExtension}"
            ],
            "group": "build",

            //컴파일시 에러를 편집기에 반영
            //참고:   https://code.visualstudio.com/docs/editor/tasks#_defining-a-problem-matcher

            "problemMatcher": {
                "fileLocation": [
                    "relative",
                    "${workspaceRoot}"
                ],
                "pattern": {
                    // The regular expression.
                  //Example to match: helloWorld.c:5:3: warning: implicit declaration of function 'prinft'
                    "regexp": "^(.*):(\\d+):(\\d+):\\s+(warning error):\\s+(.*)$",
                    "file": 1,
                    "line": 2,
                    "column": 3,
                    "severity": 4,
                    "message": 5
                }
            }
        },
        //C 컴파일
        {
            "label": "save and compile for C",
            "command": "gcc",
            "args": [
                "${file}",
                "-o",
                "${fileDirname}/${fileBasenameNoExtension}"
            ],
            "group": "build",

            //컴파일시 에러를 편집기에 반영
            //참고:   https://code.visualstudio.com/docs/editor/tasks#_defining-a-problem-matcher

            "problemMatcher": {
                "fileLocation": [
                    "relative",
                    "${workspaceRoot}"
                ],
                "pattern": {
                    // The regular expression.
                  //Example to match: helloWorld.c:5:3: warning: implicit declaration of function 'prinft'
                    "regexp": "^(.*):(\\d+):(\\d+):\\s+(warning error):\\s+(.*)$",
                    "file": 1,
                    "line": 2,
                    "column": 3,
                    "severity": 4,
                    "message": 5
                }
            }
        },
        // 바이너리 실행(Ubuntu)
        {
             "label": "execute",
             "command": "${fileDirname}/${fileBasenameNoExtension}",
             "group": "test"
        }
        // 바이너리 실행(Windows)
        //{
        //    "label": "execute",
        //    "command": "cmd",
        //    "group": "test",
        //    "args": [
        //        "/C", "${fileDirname}\\${fileBasenameNoExtension}"
        //    ]

        //}
    ]
}
컴파일, 실행 단축키를 지정합니다.
메뉴에서 Preferences->keyboard shortcut을 선택합니다.
사용자 정의로 바로 가기 키를 추가해야 합니다. 캡처화면에 빨간색 사각형으로 표시한 아이콘을 클릭합니다.

아래 내용을 입력하고 저장을 합니다.
// 키 바인딩을 이 파일에 넣어서 기본값을 덮어씁니다.
[
    //컴파일
    { "key": "ctrl+alt+c", "command": "workbench.action.tasks.build" },

    //실행
    { "key": "ctrl+alt+r", "command": "workbench.action.tasks.test" }
]
vscode내 파일 탐색기에서 OO.cpp를 선택하고 Ctrl+Alt+C를 누르면 항목에서 save and compile for C++을 선택합니다.

컴파일이 완료 되면 탐색기에 실행파일이 생성됩니다.
실행파일을 선택후 Ctrl + Alt + R을 누르면 터미널에서 실행되는것을 볼 수 있습니다.
'C++' 카테고리의 다른 글
| [C] #ifndef~ #endif (97) | 2024.02.07 |
|---|---|
| [C++] 동영상 YOLOv8 detection ONNX모델 추론(openCV) (54) | 2023.07.11 |